【Node |
您所在的位置:网站首页 › oasis 18码 › 【Node |
【Node
|
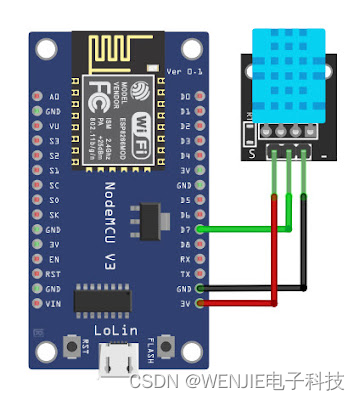
这里展示了如何使用 ESP8266 使用 Node-Red 作为物联网平台在 Web 上发布基于 MQTT 的消息。MQTT 是一种用于构建物联网应用程序的轻量级 TCP 协议。这里使用 Mosqitto MQTT 服务器/客户端应用程序。Node-Red 是开源图形化编程平台,可用作物联网平台。 这里基于 ESP8266 的 NodeMCU 板用于从 DHT11 传感器读取温度和湿度数据,并通过 WiFi 将发布的数据发送到 WiFi 服务器,以便任何人都可以通过互联网访问。 为此,我们可以将工作分为 3 个步骤,如下所示。 ESP8266 与 DHT11 接口 ESP8266编程 3.设置并运行MQTT服务器 4.为MQTT服务设置Node-Red 5.发布MQTT服务 现在在下面描述这些步骤。 1. ESP8266 与 DHT11 接口 第一步是将 DHT11 连接到 ESP8266(NodeMCU) 模块。DHT11与NodeMCU ESP8266的接口图如下所示。
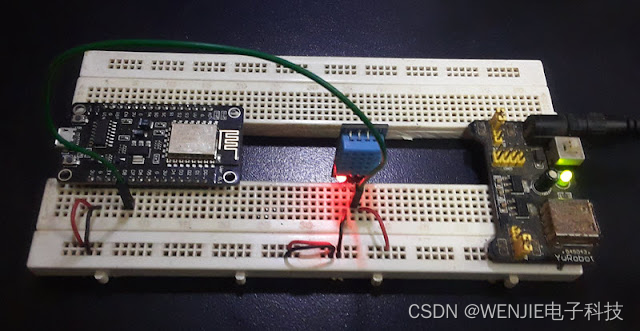
ESP8266 3.3V 电源引脚连接到 DHT11 Vcc 引脚,ESP8266 的接地引脚连接到 DHT11 的地。DHT11 的数据引脚连接到 ESP8266 NodeMCU 模块的 D7 引脚。下图是在实际面包板上实现的硬件。
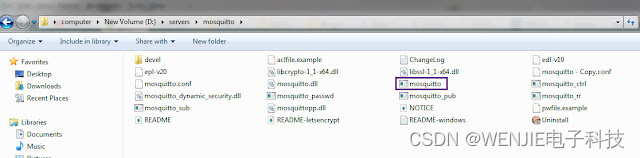
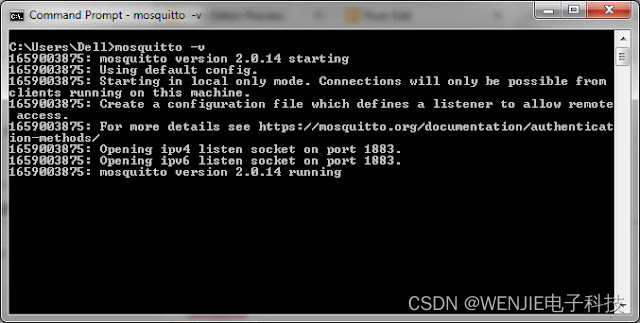
2. ESP8266编程 ESP8266 和 DHT11 之间的硬件连接完成后,下一步就是为 ESP8266 NodeMCU 编写程序。该程序将从DHT11模块读取湿度和温度数据,并通过WiFi将数据发送到MQTT服务器。以下是执行此操作的 ESP8266 程序。 #include #include #include "DHT.h" // DHT11 #define DHTTYPE DHT11 // Credentials for WiFi const char* ssid = ""; const char* password = ""; // MQTT Server(eg 192.168.1.4) const char* mqtt_server = "Your MQTT IP address"; // WiFi Client WiFiClient nodeClient; PubSubClient client(nodeClient); // DHT Sensor pin at GPIO 13(D7) const int DHTPin = 13; // Initialize DHT sensor DHT dht(DHTPin, DHTTYPE); // Function to connect NodeMCU to WiFi router void wifiConfig(){ delay(10); // We start by connecting to a WiFi network Serial.println(); Serial.print("Connecting to "); Serial.println(ssid); WiFi.begin(ssid, password); while (WiFi.status() != WL_CONNECTED) { delay(500); Serial.print("."); } Serial.println(""); Serial.print("WiFi connected, NodeMCU IP address: "); Serial.println(WiFi.localIP()); } // Function to reconnect NodeMCU with MQTT broker void reconnect(){ while (!client.connected()) { Serial.print("Attempting MQTT connection..."); if (client.connect("MQTTClient")){ Serial.println("connected"); } else{ Serial.print("failed, State: "); Serial.print(client.state()); Serial.println("try again in 5 seconds..."); delay(5000); } } } void setup(){ dht.begin(); Serial.begin(115200); wifiConfig(); client.setServer(mqtt_server, 1883); } void loop() { if (!client.connected()) { reconnect(); } if(!client.loop()) client.connect("MQTTClient"); // Read Humidity float H = dht.readHumidity(); // Read temperature as Celsius (the default) float T = dht.readTemperature(); // Check if any reads failed and exit early (to try again). if (isnan(H) || isnan(T)) { Serial.println("Failed to read from DHT sensor!"); return; } //Convert float to string and store them in arrays static char humidity[7]; dtostrf(H, 6, 2, humidity); static char temperature[7]; dtostrf(T, 6, 2, temperature); // Publishes Temperature and Humidity values client.publish("dht11/temperature", temperature); client.publish("dht11/humidity", humidity); delay(5000); }上面的程序执行以下操作。 A。DHT11 库用于连接到 DHT11 模块并检索湿度和温度数据。这是在程序的各个部分使用以下语句完成的。 #include "DHT.h" // DHT11 #define DHTTYPE DHT11 // DHT Sensor pin at GPIO 13(D7) const int DHTPin = 13; // Initialize DHT sensor DHT dht(DHTPin, DHTTYPE);下面在 setup() 函数中启动 DHT 传感器。 dht.begin();下面在loop()函数中读取湿度和温度数据。 // Read Humidity float H = dht.readHumidity(); // Read temperature as Celsius (the default) float T = dht.readTemperature();b. 设置与 WiFi 路由器的连接 这是使用 ESP8266WiFi 库完成的。以下是本步骤涉及的程序代码。调用库 ESP8266WiFi 并定义一些常量。 #include // Credentials for WiFi const char* ssid = "Your_WiFI_SSID"; const char* password = "Your_WiFi_Password";在 wifiConfig() 函数中,我们连接到本地 WiFi 网络并打印出有关连接状态的信息 // We start by connecting to a WiFi network Serial.println(); Serial.print("Connecting to "); Serial.println(ssid); WiFi.begin(ssid, password); while (WiFi.status() != WL_CONNECTED) { delay(500); Serial.print("."); } Serial.println(""); Serial.print("WiFi connected, NodeMCU IP address: "); Serial.println(WiFi.localIP());上面的代码是在wifiConfig()被执行的时候执行的。 wifiConfig();C。设置WiFi客户端并通过WiFi发布消息 下一步是创建一个 WiFi 客户端,然后将 DHT11 湿度和温度数据发送到 MQTT 服务器。客户端是使用 PubSubClient 库创建的。以下是程序中涉及的代码。 设置库,初始化 wifi 客户端对象并定义一些常量。 #include // MQTT Server(eg 192.168.1.4) const char* mqtt_server = "Your MQTT IP address"; // WiFi Client WiFiClient nodeClient; PubSubClient client(nodeClient); reconnect() 函数用于重复建立与 MQTT 服务器的连接。 // Function to reconnect NodeMCU with MQTT broker void reconnect(){ while (!client.connected()) { Serial.print("Attempting MQTT connection..."); if (client.connect("MQTTClient")){ Serial.println("connected"); } else{ Serial.print("failed, State: "); Serial.print(client.state()); Serial.println("try again in 5 seconds..."); delay(5000); } } }在 setup() 函数中,MQTT 服务器设置了端口地址。 client.setServer(mqtt_server, 1883);在 loop() 函数中,我们定期检查客户端连接。 if (!client.connected()) { reconnect(); } if(!client.loop()) client.connect("MQTTClient");同样在 loop() 函数中,我们检查读取的数据是否有效,如果有效,将浮点数据转换为字符串,保存在数组中,然后通过 wifi 发布数据。 // Check if any reads failed and exit early (to try again). if (isnan(H) || isnan(T)) { Serial.println("Failed to read from DHT sensor!"); return; } //Convert float to string and store them in arrays static char humidity[7]; dtostrf(H, 6, 2, humidity); static char temperature[7]; dtostrf(T, 6, 2, temperature); // Publishes Temperature and Humidity values client.publish("dht11/temperature", temperature); client.publish("dht11/humidity", humidity); delay(5000);3.设置并运行MQTT服务器 这里使用 Windows 中的 Mosquitto MQTT 服务器/客户端应用程序。可以从以下链接免费下载 Mosquitto 并进行安装。 https://mosquitto.org 下载后,在下载 mosquitto 应用程序的文件夹中,您应该会看到 mosquitto.exe 应用程序。
在同一文件夹中,或者如果您创建了环境变量,请使用 CLI 命令启动 mosquitto MQTT 服务器(也称为 MQTT 代理): 如下所示。
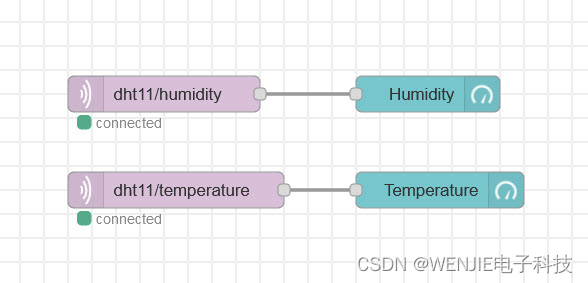
现在 MQTT 代理正在侦听本地主机端口 1883。 4.为MQTT服务设置Node-Red 下一步是设置 Node Red,以便我们可以通过 MQTT 代理发布。启动一个新流,并在该流中从仪表板库中拖入两个 mqtt_in 节点和两个仪表节点。创建流,如下所示。
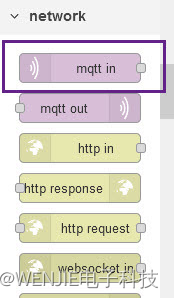
上面流程中标记为dht11/humidity和dht11/temperature的节点中的两个mqtt可以在网络库下找到。
双击节点中的每个 mqtt 并为每个节点设置以下内容。
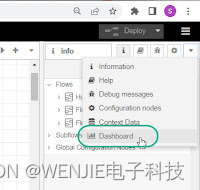
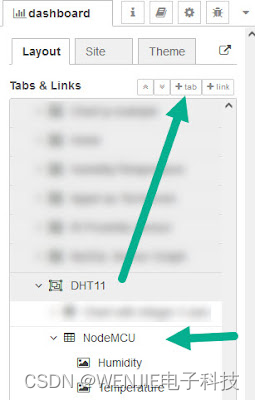
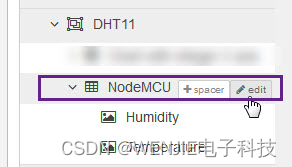
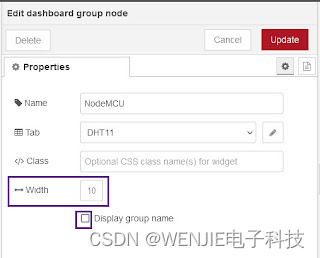
上图中,Server字段设置为localhost:1883,Action字段设置为Subscribe to single topic,Topic字段分别设置为dht11/humidity和dht11/temperature。将两者的服务质量 QoS 都设为 1。 标有湿度和温度的节点是仪表节点,可以在仪表板库下找到。Node Red IoT with Arduino DHT11教程解释了如何安装仪表板库。 仪表板节点需要选项卡和组名称。要创建选项卡和组名称,请转到如下所示的仪表板,然后从那里创建一个新选项卡。将选项卡命名为 DHT11。然后从新创建的 DHT11 选项卡中,创建一个新组并将其命名为 NodeMCU,如下所示。 现在单击组中的编辑按钮并将宽度设置为 10 并取消选中显示组名称,如下图所示。
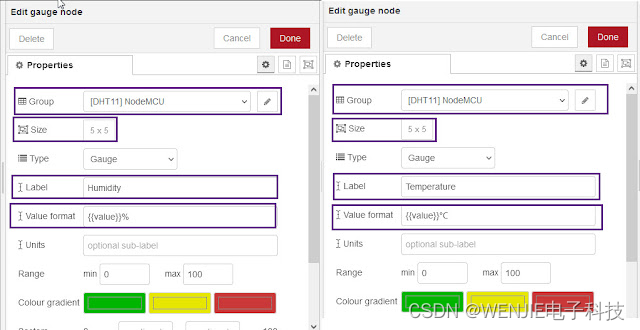
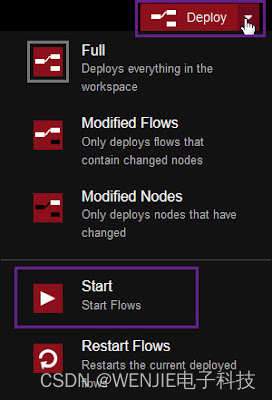
创建选项卡和组名称后,单击湿度和温度计节点,将新创建的选项卡/组分配给 [DHT11]NodeMCU。还将两个仪表节点的大小设置为 5x5。在标签字段中使用湿度和温度。然后在湿度值格式中添加 % 符号,在温度值格式中添加 ℃。 5.发布MQTT服务 此时,mosquitto MQTT 服务已准备好发布。ESP8266 将湿度和温度数据发送到 MQTT 代理,我们在 Node-Red 的节点中使用 mqtt 读取这些数据,并通过 Node-Red 物联网框架将其发布到互联网上。 要开始使用 MQTT 发布湿度和温度数据,请单击部署按钮,然后单击 Node Red 中的启动按钮。
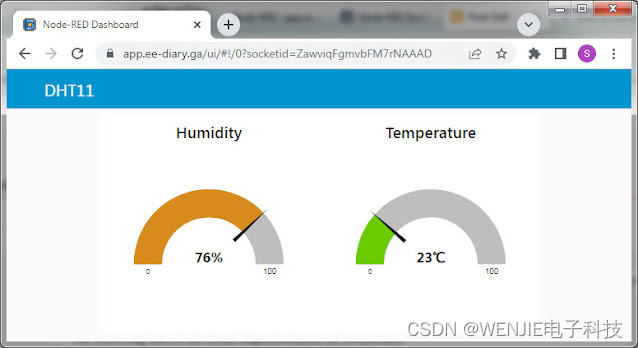
打开浏览器输入 url https://localhost:1880/ui 可以看到仪表盘上显示的湿度和温度数据,如下图所示。
如上图,数据显示使用的url是http://app.ee-diary.ga/ui。这是因为 Node Red 应用程序使用 cloudflare 托管在家庭服务器上。因此,使用 ESP8266 发布的 MQTT 数据在互联网上是公开的。这样做是为了说明使用 MQTT、ESP8266 和 NodeRed 进行简单物联网应用程序开发的示例。它可以很容易地扩展以制作工业物联网应用程序 要了解如何设置家庭服务器,请参阅教程如何在家中托管网站。要了解如何在自定义域名上托管和显示应用程序,请参阅教程使用 Cloudflare Tunnel 在 Web 上部署 Arduino Red Node 应用程序。 以下是节点红流代码。 [ { "id": "6e8e647f55f19c65", "type": "tab", "label": "Flow 1", "disabled": false, "info": "", "env": [] }, { "id": "5afcb2f70fb4032f", "type": "mqtt in", "z": "6e8e647f55f19c65", "name": "", "topic": "dht11/humidity", "qos": "1", "datatype": "auto-detect", "broker": "62942e11fc49d33e", "nl": false, "rap": true, "rh": 0, "inputs": 0, "x": 320, "y": 180, "wires": [ [ "f0c5c71cb90a0d4b" ] ] }, { "id": "f0c5c71cb90a0d4b", "type": "ui_gauge", "z": "6e8e647f55f19c65", "name": "", "group": "fecb1abb8b6d2678", "order": 1, "width": "5", "height": "5", "gtype": "gage", "title": "Humidity", "label": "", "format": "{{value}}%", "min": 0, "max": "100", "colors": [ "#00b500", "#e6e600", "#ca3838" ], "seg1": "", "seg2": "", "className": "", "x": 540, "y": 180, "wires": [] }, { "id": "bf3fce1725291ee7", "type": "mqtt in", "z": "6e8e647f55f19c65", "name": "", "topic": "dht11/temperature", "qos": "1", "datatype": "auto-detect", "broker": "62942e11fc49d33e", "nl": false, "rap": true, "rh": 0, "inputs": 0, "x": 330, "y": 260, "wires": [ [ "6f2e240f9a0c13c8" ] ] }, { "id": "6f2e240f9a0c13c8", "type": "ui_gauge", "z": "6e8e647f55f19c65", "name": "", "group": "fecb1abb8b6d2678", "order": 1, "width": "5", "height": "5", "gtype": "gage", "title": "Temperature", "label": "", "format": "{{value}}℃", "min": 0, "max": "100", "colors": [ "#00b500", "#e6e600", "#ca3838" ], "seg1": "", "seg2": "", "className": "", "x": 550, "y": 260, "wires": [] }, { "id": "62942e11fc49d33e", "type": "mqtt-broker", "name": "", "broker": "localhost", "port": "1883", "clientid": "", "autoConnect": true, "usetls": false, "protocolVersion": "4", "keepalive": "60", "cleansession": true, "birthTopic": "", "birthQos": "0", "birthPayload": "", "birthMsg": {}, "closeTopic": "", "closeQos": "0", "closePayload": "", "closeMsg": {}, "willTopic": "", "willQos": "0", "willPayload": "", "willMsg": {}, "userProps": "", "sessionExpiry": "" }, { "id": "fecb1abb8b6d2678", "type": "ui_group", "name": "NodeMCU", "tab": "886288b874f81978", "order": 1, "disp": false, "width": "10", "collapse": false, "className": "" }, { "id": "886288b874f81978", "type": "ui_tab", "name": "DHT11", "icon": "dashboard", "order": 8, "disabled": false, "hidden": false } ]因此,通过这种方式,我们可以使用 Node Red 作为物联网平台来创建简单的物联网应用程序。我们可以添加到这个 MySQL 数据库来存储湿度和温度数据,从而创建一个物联网监控系统。 |


【本文地址】